Floor leveling is one of the most important parts of a flooring project, but it is also one of the easiest steps for homeowners to underestimate. Most people get excited about the visible floor: the color of the luxury vinyl plank, the size of the tile, the grout shade, the plank direction, or how the finished room will look. Those details matter, but the surface underneath the flooring matters just as much. In many cases, it matters more.
Luxury vinyl plank and tile are both popular choices for Florida homes because they can handle daily traffic, humidity, pets, and moisture better than many other flooring materials. But neither material performs well over a bad surface. If the concrete slab or subfloor has dips, humps, waves, cracks, soft spots, old adhesive, or uneven transitions, the finished floor may develop problems even if the material itself is high quality.
This is especially true in homes built on concrete slabs, which are common throughout Florida. A slab can look solid at first glance and still be too uneven for a successful flooring installation. Small variations may not seem important when the old floor is still in place, but once a floating LVP floor starts moving or a tile floor starts showing lippage or cracking, the problem becomes much harder and more expensive to correct.
Floor leveling is not about making a floor perfectly level in the way a pool table needs to be level. In many flooring projects, the more important goal is making the surface flat, stable, and suitable for the material being installed. A floor can be slightly out of level from one side of the room to the other and still accept flooring if it is flat enough. The problems usually come from sudden dips, ridges, waves, high spots, and low areas that prevent the flooring from being properly supported.
This guide explains why floor leveling matters before installing LVP or tile, how uneven floors affect each material differently, when leveling is needed, what signs homeowners should watch for, and why surface preparation should be treated as part of the flooring system rather than an optional add-on.
The Short Answer: A Floor Is Only as Good as the Surface Underneath It
Floor leveling matters because LVP and tile both depend on a stable, properly prepared surface. If the surface underneath is uneven, the finished floor can move, crack, separate, sound hollow, wear unevenly, or fail earlier than expected. The flooring material may look beautiful on day one, but poor preparation can create problems over time.
For luxury vinyl plank, uneven areas can cause the planks to flex, click, unlock, gap, or feel unstable underfoot. Floating LVP floors are especially sensitive to dips and high spots because the locking system needs consistent support. If a plank bridges over a low spot, it may bend slightly every time someone walks across it. That repeated movement can stress the joints and shorten the life of the floor.
For tile, uneven floors can cause lippage, cracked tile, loose tile, grout cracking, and hollow-sounding areas. Tile is rigid, so it does not bend to follow an uneven surface the way a softer material might. Large-format tile is even more demanding because bigger tiles require a flatter base to sit correctly.
A properly prepared floor helps both materials perform the way they are supposed to. It creates better support, cleaner transitions, better visual results, and fewer long-term problems. That is why floor leveling is often one of the smartest investments in a flooring project, especially when the existing slab or subfloor is not ready for installation.
The key idea is simple: if the base is wrong, the finished floor may never be right.
Level vs Flat: What Homeowners Often Misunderstand
One of the most common misunderstandings in flooring is the difference between a level floor and a flat floor. Homeowners often use the words interchangeably, but they do not mean exactly the same thing.
A level floor is horizontally even from one point to another. If a ball does not roll across the room, people often say the floor is level. A flat floor, on the other hand, has no major dips, humps, ridges, waves, or sudden changes in height across the installation surface. Flooring materials usually care more about flatness than perfect levelness.
For example, a concrete slab may slope slightly from one side of a room to the other but still be smooth and flat enough for flooring. That may not cause a problem. Another slab may appear generally level but have several low spots, high ridges, or uneven patches from previous tile removal. That floor may need correction before new flooring can be installed properly.
This distinction matters because the goal of surface preparation is not always to make the entire home perfectly level. In many residential flooring projects, the goal is to correct the areas that would interfere with the new floor. That might mean filling low spots, grinding high points, smoothing rough patches, or feathering transitions between rooms.
When a contractor evaluates a floor, they are usually looking for issues such as:
- Dips or low spots that leave flooring unsupported
- High spots or ridges that create pressure points
- Uneven transitions between rooms
- Waves in the concrete slab
- Cracks, old mortar, or adhesive residue
- Soft or unstable areas in a wood subfloor
- Height differences around doors, cabinets, or adjoining floors
Understanding the difference between level and flat helps homeowners make better decisions. A floor does not need to be perfect in every possible way, but it does need to meet the requirements of the flooring being installed.
Why LVP Needs a Flat Surface
Luxury vinyl plank is often described as a flexible and forgiving flooring material, and in some ways that is true. It is more comfortable than tile, more moisture-resistant than laminate, and easier to live with than hardwood in many homes. But LVP is not a solution for an uneven floor. In fact, many LVP problems begin because the surface underneath was not flat enough before installation.
Most residential LVP installations use floating click-lock planks. These planks connect to each other and float over the surface underneath. Because the floor is not fastened to the slab in the same way as tile or glue-down flooring, it depends on even support. If the slab has a dip, the plank may bridge over that low area. When someone steps on it, the plank can flex. Over time, that movement can weaken the locking system.
This is why a floor can look good immediately after installation but start causing problems months later. The homeowner may hear clicking sounds, feel soft spots, see gaps, or notice that joints are separating. In many cases, the issue is not the LVP color, brand, or style. The issue is movement caused by an uneven surface underneath.
Common LVP Problems Caused by Uneven Floors
Uneven floors can affect LVP in several ways. The exact problem depends on the product, the installation method, the room layout, and the severity of the uneven area. However, most failures fall into a few common categories.
- Clicking or popping sounds: planks move slightly because the surface underneath does not support them evenly.
- Joint separation: repeated flexing stresses the locking system and causes gaps between planks.
- Soft or hollow-feeling areas: planks bridge over dips instead of resting firmly on the floor.
- Broken locking edges: high pressure on unsupported joints can damage the click system.
- Visible unevenness: some thin or flexible products may telegraph imperfections from the surface below.
- Premature wear: movement and instability can make the floor age faster than expected.
These issues can be frustrating because they often appear after the project is finished. Fixing them may require removing part of the floor, correcting the surface, and reinstalling material. That is why preparation before installing vinyl plank flooring is so important.
Floating LVP vs Glue-Down LVP
Floating LVP and glue-down LVP react differently to uneven surfaces, but both need preparation. Floating LVP is sensitive to dips and high spots because the planks need even support. Glue-down LVP is sensitive to surface texture, smoothness, adhesive compatibility, and moisture conditions because the plank bonds directly to the surface.
A floating floor may flex over low spots. A glue-down floor may show imperfections through the surface or fail to bond correctly if old adhesive, dust, moisture, or rough patches are present. Neither method should be treated as a way to ignore floor preparation.
In both cases, the existing surface should be checked before installation. If the floor has low areas, high ridges, or rough patches, those issues should be corrected first. A properly prepared surface helps LVP feel more solid, look cleaner, and last longer.
Why Tile Needs an Even More Stable Surface
Tile is one of the most durable flooring materials available, but it is also one of the least forgiving when the surface underneath is wrong. Tile is rigid. It does not flex much. If the substrate moves, dips, or creates uneven support, stress can transfer into the tile and grout.
This is why tile installation depends so heavily on preparation. The tile itself may be strong, but the finished floor is only as reliable as the surface, mortar coverage, layout, and installation method. A weak or uneven base can turn an expensive tile floor into a cracked or uneven one.
Large-format tile has made this even more important. Larger tiles are popular because they create a clean, modern look with fewer grout lines. But bigger tiles require flatter surfaces. A small uneven area that might be less noticeable under smaller tile can create lippage or poor bonding under larger tile.
Common Tile Problems Caused by Uneven Floors
When tile is installed over an uneven or unstable surface, the problems may appear immediately or develop over time. Some are visual, while others affect durability.
- Lippage: one tile edge sits higher than the neighboring tile, creating an uneven surface.
- Cracked tile: stress from movement or poor support can cause tile to crack.
- Cracked grout: movement below the tile can cause grout lines to break apart.
- Hollow sounds: poor bonding or uneven mortar coverage can make tiles sound hollow when tapped.
- Loose tiles: tile may release from the substrate if bonding conditions are poor.
- Uneven appearance: light reflecting across tile can make waves and height differences more visible.
These issues are not just cosmetic. Cracked tile and grout can allow moisture and dirt to enter the floor system, especially in kitchens, bathrooms, and laundry rooms. Once problems begin, repairs can be difficult because matching tile and grout later is not always easy.
Why Surface Preparation Matters So Much for Tile
Tile installation requires a stable, clean, and properly prepared surface. The installer must consider flatness, cracks, movement, mortar coverage, tile size, layout, and transitions. If the floor has dips, the tile may not sit evenly. If there are high spots, tile may rock or create lippage. If cracks or movement are present, they may need to be addressed before tile goes down.
For homeowners planning proper tile installation, the preparation phase is not separate from the installation. It is part of the installation. The finished tile depends on everything that happens before the first tile is set.
This is especially true in kitchens, bathrooms, and high-traffic areas. These rooms need floors that can handle moisture, cleaning, foot traffic, and daily use. A tile floor that is installed over a poor surface may look acceptable at first, but it may not perform the way homeowners expect.
Why Concrete Slabs in Florida Often Need Attention
Many Florida homes are built on concrete slabs, which makes slab preparation a major part of flooring success. Concrete is strong, but it is not always perfectly flat, smooth, dry, or ready for new flooring. A slab can change over time, be affected by previous flooring removal, or contain imperfections from original construction.
Concrete slab issues are especially common after old flooring is removed. Tile removal can leave thinset ridges, chipped areas, dust, rough patches, or uneven sections. Carpet removal can reveal cracks, stains, tack strip damage, or old patching. Old vinyl or glue-down flooring can leave adhesive residue that must be removed or smoothed before new flooring is installed.
Florida’s humid climate also makes moisture evaluation important. LVP and tile are both more moisture-friendly than many other flooring materials, but moisture problems underneath the flooring still matter. Surface preparation should include looking for signs of previous water damage, slab moisture concerns, and areas where water may have entered from appliances, plumbing, doors, or storms.
Common slab issues include:
- Low spots or shallow dips
- High spots or ridges
- Wavy slab surfaces
- Hairline cracks
- Old mortar or thinset from tile removal
- Adhesive residue from previous flooring
- Uneven transitions between rooms
- Moisture stains or musty smells
- Surface contamination that affects bonding or underlayment performance
Some slab issues are minor and can be corrected with localized preparation. Others require more extensive grinding, patching, or leveling compound. The important thing is to identify them before the flooring is installed, not after problems appear.
Signs Your Floor May Need Leveling Before Installation
Homeowners do not always know whether their floor needs leveling until the old flooring is removed and the surface is inspected. Still, there are warning signs that suggest the floor may need attention before LVP or tile installation.
Some signs are visible, while others are felt underfoot. A floor may look mostly normal but feel uneven when walking across it. Doors may rub. Furniture may wobble. Existing tile may be cracked. Old laminate or vinyl may have gaps or movement. These clues can point to problems below the surface.
Common signs that floor leveling may be needed include:
- Visible dips or uneven areas in the existing floor
- Furniture that rocks or does not sit evenly
- Doors that drag after flooring changes
- Cracked tile or cracked grout
- Loose or hollow-sounding tile
- Soft or bouncy spots
- Gaps or movement in existing floating floors
- Uneven transitions from one room to another
- Previous flooring failure in the same area
- Old adhesive, thinset, or patching visible after flooring removal
These signs do not always mean a major repair is needed. Sometimes only small areas require patching or smoothing. But they do mean the surface should be evaluated before new flooring goes down.
It is also important to remember that new flooring will not fix an uneven floor by itself. In many cases, it will make the problem more noticeable. A new LVP floor may move over the same dip. New tile may crack over the same weak area. Floor preparation is how the problem is corrected before it affects the finished surface.
How Floor Leveling Is Usually Done
Floor leveling is not one single process that looks the same in every home. The right method depends on the existing surface, the type of flooring being installed, the size of the uneven area, moisture conditions, and how much correction is needed. In some cases, the work is minor. In others, preparation can be a major part of the project.
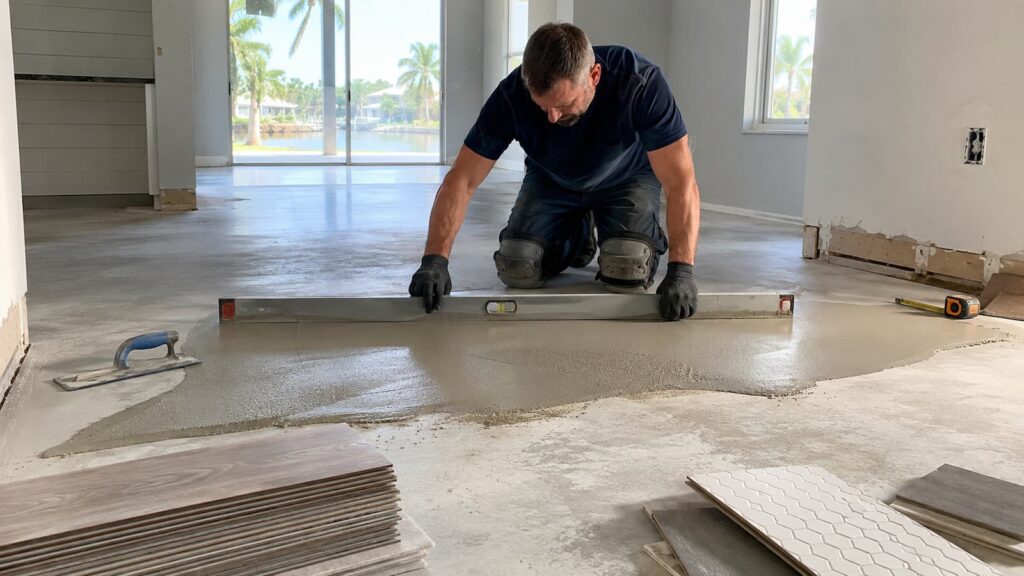
The first step is evaluation. The installer checks the floor for flatness, low spots, high spots, cracks, loose material, old adhesive, and moisture-related concerns. This may involve using a long straightedge, level, or other tools to identify variations that are not obvious by sight alone.
Once the surface is evaluated, preparation may include cleaning, scraping, grinding, patching, or applying leveling compound. The goal is to create a surface that meets the requirements of the flooring material.
Common Floor Leveling Steps
Although every project is different, floor leveling often includes some combination of the following steps:
- Removing loose material: old adhesive, thinset, debris, or unstable patches may need to be removed.
- Cleaning the surface: dust, dirt, and residue can interfere with patching or bonding.
- Grinding high spots: raised areas may need to be lowered so they do not create pressure points.
- Filling low spots: dips may be filled with patching material or leveling compound.
- Feathering transitions: height differences between rooms may need to be smoothed.
- Addressing cracks or damaged areas: cracks may need evaluation before flooring is installed.
- Checking moisture concerns: visible moisture issues should be addressed before the new floor goes in.
For concrete slabs, self-leveling underlayment or patching compounds may be used depending on the condition of the surface. For wood subfloors, the work may involve fastening loose areas, replacing damaged sections, sanding high spots, or adding suitable underlayment.
The important point is that leveling is not just pouring material on the floor. It requires understanding the existing surface and the flooring that will be installed on top of it. A floor should be prepared for the specific product and installation method, not treated with a one-size-fits-all approach.
Floor Leveling Before LVP vs Floor Leveling Before Tile
LVP and tile both need proper surface preparation, but the reasons are different. LVP needs support and stability so planks do not flex or separate. Tile needs a rigid, stable, flat surface so tiles bond correctly and do not crack or show lippage.
Before installing LVP, the installer is usually focused on preventing movement, hollow spots, joint stress, and visible telegraphing. A floating LVP floor needs to rest evenly across the surface. Glue-down LVP needs a smooth, clean, and properly prepared surface so the adhesive can perform correctly.
Before installing tile, the installer is focused on flatness, stability, bonding, mortar coverage, and tile layout. Because tile is rigid, unevenness can create immediate visual problems and long-term cracking. Large-format tile is especially sensitive because its size makes surface variation more noticeable.
A simple comparison looks like this:
| Preparation Issue | Why It Matters for LVP | Why It Matters for Tile |
|---|---|---|
| Low spots | Planks can flex and joints can separate | Tile may not be fully supported |
| High spots | Locking system can be stressed | Tile can rock or show lippage |
| Old adhesive or residue | Can affect smoothness or underlayment performance | Can affect bonding and surface flatness |
| Cracks | May indicate movement or surface damage | Can transfer stress into tile if not addressed |
| Soft spots | Floor may feel unstable | Tile or grout may crack |
| Moisture issues | Can affect underlayment, adhesive, or hidden areas | Can affect substrate and long-term performance |
The same uneven slab may require a different preparation strategy depending on whether the finished floor will be LVP or tile. That is why the floor should be evaluated with the final flooring material in mind.
What Happens If You Skip Floor Leveling?
Skipping floor leveling may reduce the upfront cost of a project, but it can increase the risk of problems later. This is one of the most common flooring mistakes homeowners make. The new floor may look acceptable right after installation, but problems can develop as the floor is used.
With LVP, skipping leveling can lead to movement. A plank that flexes once may not seem like a big problem. But a plank that flexes every day for months or years can stress the locking system and create gaps, noise, or damaged edges. Once floating LVP starts separating, the repair may require removing sections of the floor to correct the surface underneath.
With tile, skipping leveling can lead to visible and structural issues. Uneven tile may create trip points or an uneven appearance. Poor support can contribute to cracked tile or grout. Hollow-sounding areas may indicate poor bonding. Repairs can be difficult because tile removal often damages surrounding material, and matching replacement tile can be challenging.
Common consequences of skipping leveling include:
- Clicking or hollow sounds under LVP
- LVP plank separation or broken locking edges
- Soft-feeling areas under floating floors
- Cracked tile or cracked grout
- Tile lippage and uneven edges
- Loose or hollow-sounding tile
- Premature wear in high-traffic areas
- Visible waves or imperfections in the finished floor
- More expensive repairs later
The most frustrating part is that many of these issues are preventable. Correcting the surface before installation is usually easier than repairing the finished floor after it fails.
Subfloor Damage Is Not the Same as Floor Leveling
Floor leveling corrects unevenness, but it does not automatically solve every problem underneath the flooring. If the subfloor is damaged, soft, rotten, swollen, loose, or structurally unstable, it may need repair before leveling or flooring installation can happen.
This distinction matters because some homeowners assume that leveling compound can fix any floor problem. It cannot. Leveling material should be installed over a suitable surface. If the base is moving, soft, wet, or damaged, the underlying issue must be corrected first.
Subfloor problems are often found in homes with previous water leaks, old flooring failure, soft spots, or moisture damage. A room may need subfloor repair before it needs leveling. In other cases, both may be required: first repair the damaged area, then level or smooth the surface for the new flooring.
Signs that the issue may be more than simple unevenness include:
- Soft or spongy spots underfoot
- Movement when walking
- Musty odors
- Visible water stains
- Swollen or deteriorated material
- Loose areas around previous flooring
- Repeated cracking in the same location
- Damage near appliances, bathrooms, or exterior doors
If these conditions are present, covering the floor with new material is not a good long-term solution. The surface may need to be repaired, dried, reinforced, or replaced before the flooring installation can proceed.
Water Damage and Floor Leveling
Water damage can complicate floor leveling because moisture can affect both the visible floor and the surface underneath. In Florida homes, water damage does not always come from storms or flooding. It often comes from ordinary household problems: refrigerator lines, dishwasher leaks, washing machine overflows, toilet leaks, water heaters, AC condensate lines, or rainwater entering near doors.
If water has affected the existing floor, the damaged material may need to be removed before the surface can be evaluated. A floor may look uneven because the old material has swollen, lifted, or separated. In that case, leveling alone may not solve the issue. The source of the moisture must be fixed, damaged material must be removed, and the base must be checked.
Water-damaged areas can create several problems for new flooring:
- Soft or unstable spots
- Hidden moisture under old flooring
- Odor or musty conditions
- Damaged underlayment or subfloor material
- Adhesive failure
- Uneven surfaces caused by swelling or deterioration
- Baseboard or wall damage near the floor
If moisture has already damaged the floor system, replacing water-damaged flooring may involve more than installing new planks or tile. The damaged area must be opened up, evaluated, corrected, and prepared so the replacement floor has a stable foundation.
In short, leveling is only useful after the floor is dry, stable, and suitable for preparation. If moisture is still active or damage remains underneath, the new floor may fail no matter how carefully it is installed.
Floor Leveling and Room Transitions
Floor leveling is not only about the middle of the room. Transitions between rooms can be just as important. When a new floor meets tile, carpet, hardwood, laminate, exterior doors, closets, bathrooms, or laundry rooms, height differences must be handled carefully.
Uneven transitions can create tripping hazards, awkward threshold pieces, visual interruptions, and installation problems. They can also affect how doors open, how appliances fit, and how baseboards or trim align. In open homes, transitions are especially noticeable because flooring often continues from one area to another.
LVP and tile handle transitions differently. LVP may need transition strips, expansion space, or reducers depending on the adjoining flooring height. Tile may need careful layout and height planning so the finished surface does not create an uncomfortable edge. If one room is higher or lower than the next, leveling or feathering may be needed to create a smoother transition.
Transition planning matters around:
- Kitchen-to-living room openings
- Hallways and bedrooms
- Bathrooms and laundry rooms
- Exterior doors and sliders
- Closets and built-ins
- Existing tile or hardwood areas
- Garage entries
Good transition planning makes the project look more finished. It also helps avoid practical problems such as doors rubbing, appliances not fitting correctly, or awkward height changes between rooms.
How Floor Leveling Affects Cost
Floor leveling can add cost to a flooring project, but it is usually less expensive than repairing or replacing a failed floor later. The cost depends on the size of the area, how uneven the surface is, what materials are needed, how much old residue must be removed, and whether the problem is localized or spread across multiple rooms.
A small low spot may only require minor patching. A large uneven slab may require grinding, priming, and leveling compound across a wider area. If old tile was removed, the slab may need additional work to remove mortar ridges and smooth the surface. If the floor has moisture damage or structural problems, repairs may be needed before leveling can begin.
Several factors can affect leveling cost:
- Total square footage that needs correction
- Depth of low spots
- Number of high spots that need grinding
- Amount of old adhesive or thinset residue
- Type of leveling or patching material required
- Whether moisture concerns are present
- Whether subfloor repairs are needed first
- How quickly the area must be ready for flooring installation
Homeowners sometimes see leveling as an unwanted extra because it is not visible after the project is complete. But that invisible work is often what protects the visible floor. A stable, flat surface helps LVP feel solid and helps tile stay bonded and even.
The better way to think about leveling is not “extra cost” but “risk reduction.” It helps reduce the chance of callbacks, movement, cracks, gaps, and premature flooring failure.
Can You Install LVP or Tile Without Leveling?
Sometimes, yes. Not every flooring project requires leveling. If the existing surface is flat, clean, stable, dry, and meets the flooring manufacturer’s requirements, installation may be able to proceed with only basic preparation. Many homes need cleaning, minor patching, or surface smoothing rather than major leveling.
The problem is assuming the floor is ready without checking it. A homeowner may not notice slight waves or low spots while walking on old carpet or tile. Once that flooring is removed, the surface may tell a different story. This is why professional evaluation is important before making final decisions about cost and installation.
LVP or tile may not need leveling if:
- The surface is already flat enough for the product
- There are no significant dips or high spots
- The slab or subfloor is stable
- Old adhesive or residue has been removed
- There are no moisture-related concerns
- Transitions between rooms can be handled cleanly
- The installation requirements for the material are met
However, if the surface does not meet those conditions, skipping preparation is risky. The flooring may still be installed, but it may not perform correctly. The real question is not whether installation is physically possible. The question is whether it is likely to last and feel right.
Questions to Ask Before Installing LVP or Tile
Before approving a flooring project, homeowners should ask specific questions about the condition of the surface underneath. This is especially important if the project involves a concrete slab, old tile removal, previous water damage, or a floating floor system.
Good questions help reveal whether the estimate includes the preparation needed for a durable result. They also help homeowners compare contractors more fairly, because one estimate may include surface correction while another may only include basic installation.
Useful questions include:
- Will the floor be checked for flatness before installation?
- Are there any visible dips, high spots, cracks, or uneven transitions?
- Does the existing surface meet the manufacturer’s requirements?
- Will old adhesive, mortar, or residue need to be removed?
- Is floor leveling included in the estimate or priced separately?
- What happens if problems are discovered after old flooring is removed?
- Are there signs of previous water damage?
- Does the subfloor feel soft, unstable, or damaged?
- How will transitions between rooms be handled?
- How long does the leveling material need before flooring can be installed?
These questions are practical, not overly technical. A good flooring contractor should be able to explain what the surface needs and why. If the answer is simply “it should be fine” without checking the floor, that may be a warning sign.
Common Mistakes Homeowners Make With Floor Prep
Many flooring problems begin with the same mistake: treating surface preparation as optional. Homeowners naturally want to spend money on the floor they can see. But the finished floor depends on the base below it.
One common mistake is assuming that a thicker LVP product will hide unevenness. A thicker plank may feel more substantial, but it still needs support. If it bridges over dips, the locking system can still be stressed. Another mistake is assuming tile mortar can fix an uneven floor by itself. Mortar is not a substitute for proper substrate preparation, especially with large-format tile.
Homeowners may also underestimate the impact of old flooring removal. Removing tile, carpet, laminate, or glue-down vinyl often reveals conditions that were hidden. What looked like a simple installation may become a preparation project once the old material is gone.
The most common floor prep mistakes include:
- Choosing flooring before evaluating the slab or subfloor
- Assuming new flooring will hide unevenness
- Skipping leveling to reduce upfront cost
- Installing floating LVP over low spots
- Installing tile over unstable or uneven areas
- Ignoring soft spots or subfloor movement
- Covering old water damage instead of correcting it
- Forgetting about transitions, door clearance, and adjoining floor heights
A good floor prep plan helps prevent these mistakes. It gives the finished flooring the conditions it needs to perform properly.
Final Thoughts: Floor Leveling Protects the Whole Flooring Investment
Floor leveling matters before installing LVP or tile because both materials depend on the surface underneath them. Luxury vinyl plank needs a flat, stable base so the planks do not flex, click, separate, or feel hollow. Tile needs a rigid, even, properly prepared substrate so it can bond correctly, avoid lippage, and resist cracking over time.
In Florida homes, this is especially important because many properties are built on concrete slabs, and those slabs are not always ready for new flooring. Old tile removal, adhesive residue, cracks, low spots, high spots, moisture issues, and previous water damage can all affect the project. These problems should be identified before installation begins.
Floor leveling may not be the most visible part of the job, but it is one of the most important. It helps protect the appearance, comfort, durability, and long-term performance of the finished floor. Skipping it may save money at the start, but it can lead to movement, cracks, gaps, hollow sounds, or premature replacement later.
The best flooring projects start with the surface, not just the material. Before choosing LVP or tile, the existing floor should be checked for flatness, stability, moisture, and damage. If the base is ready, the installation has a much better chance of lasting. If the base is not ready, fixing it first is the smarter investment.
For homeowners planning a flooring project, working with an experienced flooring contractor can help identify problems before they become expensive mistakes. When the floor is properly leveled and prepared, the finished LVP or tile has the support it needs to look better, feel better, and perform better for years.